Several years ago, Judy Walker came to Nashville to teach workshops in both on and off loom bead weaving. Judy is the author of The Beaded Sphere And Variations. Judy and her husband had designed and built a paper clip loom (available in 3 sizes) which meant that there weren’t any warp ends to deal with after the weaving was done. My friends and I had a great weekend using beads on her loom and also creating 3D objects off the loom. During the workshop I heard her mention that the bead loom could also be used for tapestry weaving. At the time I was obsessed with off loom bead weaving, especially 3D objects, but the info seemed to have stuck. I wasn’t weaving tapestry or any thing at that time but lo and behold, here I am today with boxes of wool and other yarns for tapestry weaving. How this came about is a story for another time.
The Beaded Sphere by Judy Walker
Now that time has gone by and interests have changed/evolved, I am working on a series of small tapestries some of which will be sewn together to create a larger work. This idea to weave small parts to be joined together came out of a design workshop with Tommye Scanlin. I love the idea of bringing small parts together to create a whole. Today, I thought I’d share prepping the loom as I prepare for the next series of weavings.

The paper clip loom
The Walker Paper Clip Loom is fairly simple in design with a really nice wood being used with the hardware. I keep a lot of clips on both bars and then like a heddle loom, I move what I need to center and leave the rest to the sides. Here I have counted out 20 clips for a warp with 10EPI. I use tape to mark the 4” width that I want and keep the paper clips in the area while I’m warping the loom. For you math friends I know that sounds like I didn't put enough clips in place. But each paper clip gives me two warp ends, so 5 clips create 10 warp ends. I also have the option of using two ends as one for a 5EPI.
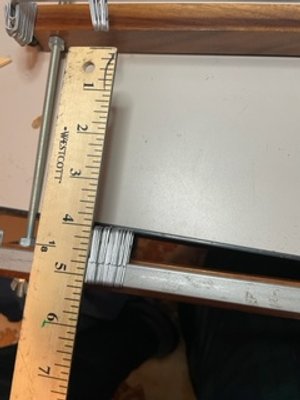
Measuring for a 4” square
The two threaded rods on each side allow me to adjust the height or length to the weaving. I still have to remind myself to measure from the end of the clips and not from the bars. Measuring from the bars will not give me the desired length that I want which is fine for a sample but not for pieces I hope will become part of my portfolio.

Taping in the top bar weaving area
To finish this part of the prep, I double check the count of paper clips on each bar, mark off the weaving area of the top bar and also look to make sure the spacing between the two bars are as even as possible.

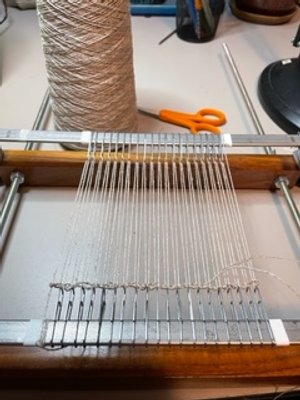
Warping the loom
Now it is time to put on the warp! I’ve anchored a linen warp to the bar closest to me and stretched it to the other bar. The warp thread will hook on to each clip, back and forth while I slide each clip in to its space. The spacing isn’t going to be exact during this step but it’s good to get it as close as possible. And maintaining the tension is a good idea from the start as well.

Warping the loom
Slow and steady gets things pretty much in place. But as I typically say in fiber workshops, “Thread is your friend and your enemy”. The linen warp is wonderful in color, strength and quality, but it finds its way around other clips, wraps around the knob on the side of the loom and hooks on to anything nearby. Luckily it hasn’t found my coffee cup that I’ve learned to keep an eye on as well.

Anchoring the warp to the top bar
Once the warp is looped on to each paper clip, it’s time to tie the warp to the loom. Before tying this on, I can double check and adjust my tension. But I am also going to get help with this by adjusting the position of the bolts on the threaded bars.

Tightening the tension
Twining the warp
The twining for this series is going to be the linen warp, but I do think it’s fun and often interesting to use a different thread or yarn for the twining. I like to add two rows of twining at the start and end of a weaving. On this loom the loops created by the warp and the clips will keep the weft from sliding off. But twining also helps with organizing and spacing the warp ends. It’s kind of in my nature to skip steps that aren’t necessary, but twining at start and end has been a habit in weaving for years.
The loom is now set for weaving, the cartoon is prepped from some design work I did earlier and it’s just a matter of weaving four squares (and a spare or two for good luck) on this loom to create an 8” x 8” final work. Once I’m done weaving, I will loosen the tension and slip the piece off of the clips. Easy! Breezy! Cover Girl! No fringe, no knotting warp ends, nothing to cut and sew back.
I emailed Judy a few months ago to let her know I was still using her loom ( I somehow ended up with three of these). She informed me that they hadn’t been in production mode with the looms and only had a few large ones left. Her husband builds the looms and I believe they now have new projects that take their time and attention. Other options for using the paper clips is that a Mirror loom can be converted to paper clips. Mirror has instructional videos on converting their loom to using paper clips, https://www.youtube.com/watch?v=4aX4QZ0IQQ0\. You can probably use the same materials they suggest to convert a basic pipe loom for warp end or four selvedge weaving. There is also a supplemental warp technique to achieve the same results, but that’s just not in my nature…